My Make Up Routine - GOLD Makes the World Go 'Round
- Asya Brown

- Feb 11, 2022
- 7 min read
Happy Fashion & Beauty Friday!
Welcome to my Makeup Tips and Routine!
Tip #1: Wearing makeup while working out is a big no no. When you sweat, your pores open and if you’re wearing makeup while your pores are open, the ingredients seep into your skin and create acne. I like to workout first thing in the morning. I wake up, meditate, brush my teeth, shower, head to my workout, come back, shower, head to my vanity mirror, apply my skin care products, enjoy some tea and then apply my make up. Here we go!

My Makeup Regiment:

Step 1: Eyebrows!!! Eyebrows really frame your face and that’s why I choose to do them first because they are so important to your makeup look. I am a loyal Anastasia Brow customer. I love love love her Brow Pencil . When I first learned about her line, I used the Brow wiz. However, I found that I could get the precision I wanted with the pencil. Everyone is different but I love the pencil more! I also line my eyebrow
Step 2: Concealer- For a while I was using Nars and I like their products but I noticed that the color I was using was not true to my skin tone - which is very important to get right! After getting some help with a wonderful Sephora associate,
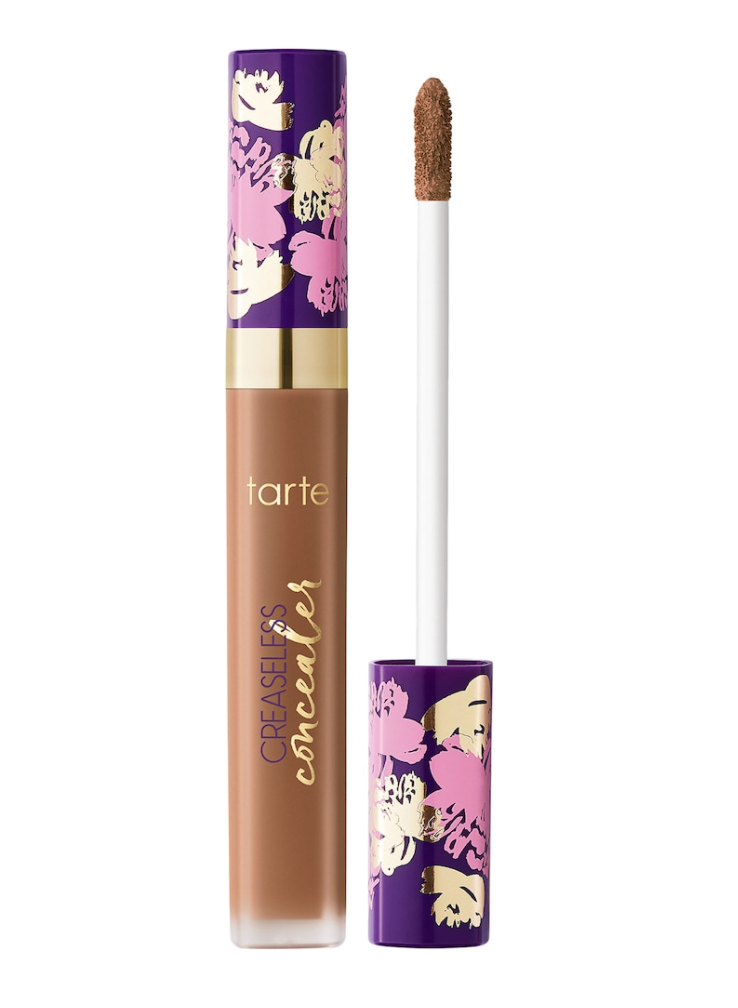
I found the Tarte Creaseless Concealer and I love it! I use “Rich Honey” and it’s the perfect shade for me and I love how it glides on so seamlessly… literally Creaseless! I also use this concealer to cover any acne scars before my foundation

Step 3: Foundation! Again, finding the right shade to match not only your skin tone but also your undertone is sooo important! I had been using Bare essentials for the longest time because I liked how natural their products looked. However, when Rihanna came out with Fenty Beauty I knew I had to try it out. She had a wide range of shades for darker complexioned women and that was really exciting for me! Another reason I love her foundation is because it lasts so long! You only need to apply one pump of her Pro Filt’r Soft Matte foundation to the backside of your hand and use the Beauty Blender Brush to apply to your face. One pump is enough for a full coverage look, truly amazing!
Side note, lately I have bene using concealer to cover any blemishes and it's been working really really well! So if you are not going for a full glam or lighter glam, I highly recommend also using just concealer as your foundation!
Step 4: Contour- I know I sound like a broken record but finding the right color for your contour is important to give you the chiseled look that you may not have naturally. You want to achieve shadows on the larger areas of your face...I actually learned the “3 technique” from the Kardashians…

Each contour product is created differently but Rihanna’s Fenty beauty Match Stix is perfect for application. I start at my forehead, then curve, to my cheekbone, and then curve again to my jawline to create a 3 figure on both sides of your face. Then I draw two lines of wih the match stix on either side of my nose and circle on the tip of my nose to create a “nose lift” look… As far as the color goes, I use the color Espresso! It's so perfect!
Step 5: Blend, Blend, Blend!!! Blending is so important. You want to create an airbrushed look when it's all said and done and blending is a key component of that. In order for me to ensure I blend my makeup well, I use my
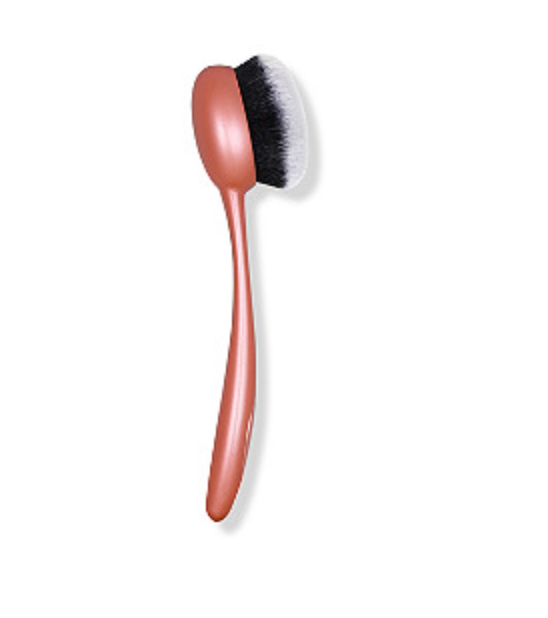
and blend the contour into my foundation… Just enough to create the shadows and get rid of any lines.

Step 6: My favorite part, Highlight! One thing I cannot stress enough is finding the right colors for you! That goes for foundation, concealer, contour, and especially...Highlight! My favorite Highlighter is Gold Deposit from MAC. I swear by gold deposit! It’s so fun to use and gives me the glow that works well with my undertone. MAC has other shades for highlights so I would recommend it, if you haven’t found a highlight that you’re obsessed with; try them out!

Step 7: Setting Powder! Almost every make up influencer I have watched has recommended Laura Mercier’s setting powder. I bought the translucent one and the relatively new, Medium deep shade. I tried the medium deep one first and loved it so much that I still haven’t tried the original translucent one. I honestly feel like since I started using the setting powder, I’ve been achieving the makeup look over always wanted; matte and airbrushed. I use a loose powder puff to pat the setting powder all over my face and it seals in the makeup. It doesn’t take too long to seal in either. I love it so much and wonder what I was doing without it!

Step 8: Eyeshadow! I’ve been using Juvias place warrior palette for awhile now and the only challenge here is that out of the whole palette, I only use one color and that’s the Bakwa color haven’t really found the other colors to be a fit for me. To be honest, I have kept the palette in my makeup drawer just waiting for the opportunity/day/event to wear the other colors but I’m just so satisfied with the Bakwa gold that I want to wear it every day haha...anyway, I apply the Bakwa gold eyeshadow to the inner corners of my eye, under my eyebrow, the bridge of my nose, my Cupid’s bow, and my cheek bones one (yes I mix my highlight and eyeshadow for my cheekbones- it creates the perfect shade to light up the face)

Step 9: Lashes- Okay so like most makeup enthusiasts, no full glam is complete without lashes. Well I feel that way with every look. I feel like lashes not only make you feel beautiful but also they are the cherry on top to your look whether you are wearing makeup or not! I must say that I have had quite the journey when it comes to lashes. I've gone from wearing lash extensions to strip lashes, to magnetic lashes to lash extensions, back to magnetic. The change of lash style came from either lash technicians who did not know that not everyone's lashes cannot hold the same density of individual lash ( my case, I have thinner natural lashes); then with strip lashes overtime, my eyelids became irritated with the adhesive and began to swell so I started wearing magnetic lashes.
Then I moved to LA, enjoy water sports, being active, and overall just like to get up and go and still feel beautiful so I figured I would give lash

extension life another try. I have gone to at least 4 lash techs since living in LA. All have been great experiences, but I have landed on one lash tech that I enjoy in particular ..She has great prices, her studio is at the corner of Rodeo drive (so luxe), she has great energy and vibes in her studio, she does house calls if needed, she is a black woman AND I always love her work. If you are ever in LA and are looking for a good lash artist for lash extensions, I recommend Toni with PrettynLashess ! As a far as Magnetic lashes goes, I recommend, the 5D Faux Mink Lashes ! I
Step 10: Eyeliner! Eyeliner is always cherry on top to a full glam. I like my eyes and for awhile I took a break from the eyeliner look because I often felt like lashes framed my eyes well enough! But then I decide to just wear eyeliner when I went out at night and then I changed my eyeliner technique to be a little slimmer and a light cat eye. As anyone who is in to make up probably knows, as the years progress, you get better at doing your makeup. Eyeliner and eyebrows are two areas that I have grown immensely in!! Anyway, whether you like thin or thick liner I recommend two brands. For liquid liner, I highly recommend Waterproof Almay Liquid liner in black! It stays on all day and it's the perfect black for any melanated queen. A secondary option for liquid liner would be Revlon color Stay Liquid liner . I have been using this one recently and it gets the job done. My first choice is often Almay but if CVS or Amazon runs out, Revlon is a very close second!

Okay so for bottom liner. Any good cat eye needs a strong bottom liner to keep the shape and bolden the look. For stick liners I love love love L'oreal smoldering liner . This liner stays on all day and is very dark. Oh be sure to get it in black. Unless you find the brown liner is your jam (which is a thing, sometimes brown liner is the perfect shade to make your eye pop against your skin) . For some people black liner is too dark of a contrast. Try them both, see what works! You will not be disappointed in the brand :)

Step 11: Lips- so I ran out of my brown lip liner once and used my eyebrow pencil to line my lips and it was a great substitute! So much so, that I stopped buying lip liner. Don’t you love when that happens?! When improvising ends up working better than the original plan! So great and I get to save some money there...truly amazing! Anyway, I love a nude lip so I pair my pseudo lip liner with a sheer, sparkly lip gloss from MAC, called C-thru.... Lately, MAC has beenout of C-Thur, so if that is still the case, I would recommend using Very go Lightly I know I keep saying that certain products are my favorite, well here is another one. I feel like a good lip gloss really can seal the deal on a look and appears that you did more than you did. We love that

Step 12: Final step - setting spray! Anyone who is a makeup enthusiast knows that no makeup look is complete without a setting spray. My favorite setting spray is Urban decay setting spray! I used to use the long lasting one but lately I’ve been in a Matte phase so now I use the Matte one. Pro tip: when using setting spray, spray your face about a “hand distance” away from your face. This way you don’t either get white residue spots on your face or have a drenched face that leaves streams running down your face! (Trust me, I’ve done it before and you feel like all of your hard work is gone to waste). I’ve tried to fix it when that happens but it never looks as polished and airbrushed as I would want it to look

I added Jewels to this look for New Years Eve Party!
I hope you learned something new about makeup and skin care. Feel free to reach out with any questions :)


Comments